

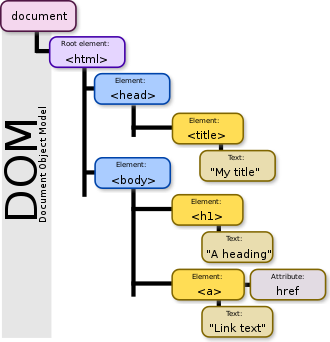
Dom
- DOM(Document Object Model)은 웹 페이지의 구조를 프로그래밍 방식으로 접근하고 조작할 수 있게 해주는 인터페이스
- HTML문서의 구조를 트리 형태로 나타내며, 각 노드는 문서 내의 객체(예: 태그, 속성, 텍스트 등)를 나타낸다.
- 즉, HTML의 요소들을 우리가 알고있는 dictionary 형태의 dataset으로 간주하여 다룰 수 있게 하는 것이다.
출처 : https://ko.wikipedia.org/
Dom 조작
- JavaScript는 DOM을 사용하여 브라우저를 조작할 수 있다.
- 웹페이지에 해당하는 document의 title을 JavaScript를 활용해서 변경함으로써 상단 tab의 문자를 변경할 수 있다.
- Document
- HTML 문서를 의미하며, 우리가 다룰 웹페이지이다.
- 위의 예시에서 document.title 은 웹페이지의 제목을 의미한다.
- Dom 조작을 위해서는
- 선택 ⇒ 변경 두 단계를 거친다.
- 선택
- selector를 활용하여 특정 요소를 선택한다.
- css에서는 class, JavaScript를 활용한 Dom 조작에는 id가 주로 쓰인다.
- 변경
- 선택된 요소에 대해서 특정 동작을 실행한다.
Selector
- Browser의 Console 안에서 document.querySelector( 선택자 ) 를 활용해서 특정 요소를 선택한다.
- id, class 또는 css에서 배운 선택자를 활용할 수 있다.
- 다음은 id를 활용하여 선택한 뒤 요소의 color를 변경한 예시이다.
<!DOCTYPE html>
<html lang="en">

<head>
  <meta charset="UTF-8">
  <meta name="viewport" content="width=device-width, initial-scale=1.0">
  <title>Document</title>
</head>

<body>
  <div id="hello-world">Hello World!</div>
</body>

</html>// console
const text = document.querySelector('#hello-world')
text.style.color = 'brown'
- document.querySelectorAll( 선택자 ) 을 활용하면 여러 element를 동시에 선택할 수 있다.
<!DOCTYPE html>
<html lang="en">

<head>
  <meta charset="UTF-8">
  <meta name="viewport" content="width=device-width, initial-scale=1.0">
  <title>Document</title>
  <style>
    .red {
      color: red;
    }
  </style>
</head>

<body>
  <div>Hello</div>
  <div>World!</div>
</body>

</html>//console
const divTags = document.querySelectorAll('div')
for (let divTag of divTags) {
divTag.classList.add('red')
}
[실습]
1. 브라우저의 개발자도구를 활용하여 다음 div태그의 text를 변경하시오.
- hint : innerText attribute 활용
<body>
  <div id="text">Hello World!</div>
</body>// console
document.getElementById("text").innerText = "New Text!";
2. body 태그 안의 script 태그를 작성하여 다음 div태그의 색을 변경하시오.
- hint : 요소의 style attribute ⇒ style의 color attribute 활용
<body>
  <div id="text">Hello World!</div>
  <script>

  </script>
</body>// console
document.getElementById("text").style.color = "blue";
Event
- 이벤트(Event)는 웹 페이지에서 발생하는 다양한 액션 또는 사건을 의미한다.
- 사용자가 마우스 클릭, 키보드 입력, 페이지 로딩, 마우스 오버 등을 수행할 때 발생하거나, 웹 페이지 자체에서 자동으로 발생할 수도 있다.
- 요소를 선택 후 이벤트에 대해 동작을 지정할 수 있다.
- querySelector를 사용하여 요소 선택
- addEventListener 를 사용하여 event에 대한 동작 지정
- addEventListener( 이벤트, 이벤트가 발생했을 시 실행될 동작)
- 이때, 동작에 대한 부분은 함수로 작성이 된다.
- 해당 함수는 event를 input으로 가지며, 생략 가능하다.
<head>
  <style>
    .red {
      color: red;
    }
  </style>
</head>

<body>
  <div>Hello World!</div>

</body>
<script>
  const div = document.querySelector('div');
  div.addEventListener('click', () => {
    div.classList.toggle('red');
  });
  // div.addEventListener('click', (event) => {
  //   div.classList.toggle('red');
  //   console.log(event);
  //   console.log(event.target);
  // });
</script>
[실습]
1. 다음 HTML을 참고하여 버튼을 누르면 숫자가 1 증가하는 기능을 구현하시오
- hint
- 버튼을 클릭하는 이벤트는 click이다.
- 요소 안의 text는 element.innerText 속성으로 접근할 수 있다.
- 숫자 0을 가지고 있는 변수를 새로 선언해도 좋다. 형변환을 위해서는 Number 를 사용하면 된다.
<div>0</div>
<button>버튼</button><!DOCTYPE html>
<html lang="en">
<head>
<meta charset="UTF-8">
<meta name="viewport" content="width=device-width, initial-scale=1.0">
<title>Counter</title>
</head>
<body>
<div id="counter">0</div>
<button id="incrementBtn">버튼</button>
<script>
// 초기 카운터 값을 0으로 설정
let counterValue = 0;
const counterElement = document.getElementById("counter");
const incrementButton = document.getElementById("incrementBtn");
function incrementCounter() {
counterValue++;
counterElement.innerText = counterValue;
}
incrementButton.addEventListener("click", incrementCounter);
</script>
</body>
</html>
2. 다음 HTML을 참고하여 마우스를 올리면 색이 빨간색으로 변하고, 내리면 다시 검정색으로 변하는 기능을 구현하시오.
- hint
- 마우스를 올리는 이벤트는 mouseover, 내리는 이벤트는 mouseover이다.
- 요소의 style은 element.style.바꿀스타일로 접근할 수 있다.
<style>
  .box {
    width: 100px;
    height: 100px;
    background-color: black;
  }
</style>

<div class="box"></div><!DOCTYPE html>
<html lang="en">
<head>
<meta charset="UTF-8">
<meta name="viewport" content="width=device-width, initial-scale=1.0">
<title>Text Color Change</title>
</head>
<body>
<h1 id="heading">color</h1>
<input type="text" id="colorInput">
<script>
const headingElement = document.getElementById("heading");
const colorInputElement = document.getElementById("colorInput");
colorInputElement.addEventListener("input", function() {
// 입력된 색상 값을 가져와 텍스트 색상으로 설정
headingElement.style.color = colorInputElement.value;
});
</script>
</body>
</html>
3. 다음 HTML을 참고하여 색상을 입력하면 텍스트의 색이 변하는 기능을 구현하시오.
- hint
- 입력하는 이벤트는 input이다.
  <h1>what color am I</h1>
<input type="text"><!DOCTYPE html>
<html lang="en">
<head>
<meta charset="UTF-8">
<meta name="viewport" content="width=device-width, initial-scale=1.0">
<title>Color Change</title>
<style>
.box {
width: 100px;
height: 100px;
background-color: black;
}
</style>
</head>
<body>
<div class="box" id="box"></div>
<script>
const boxElement = document.getElementById("box");
boxElement.addEventListener("mouseover", function() {
boxElement.style.backgroundColor = "red";
});
boxElement.addEventListener("mouseout", function() {
boxElement.style.backgroundColor = "black";
});
</script>
</body>
</html>
'Javascript' 카테고리의 다른 글
| JavaScript 문법(2) (0) | 2024.03.25 |
|---|---|
| JavaScript 문법(1) (0) | 2024.03.25 |