

목차
[실습]
1. 다음 코드를 참고하여 색상을 입력하면 텍스트이 색상이 변하도록 구현하시오.
<template>
  <div>
    <input type="text">
    <h1 :style="`color: ${text};`">color change!</h1>
  </div>
</template>

<script setup>

</script>

<style lang="scss" scoped>

</style>
- App.vue
<template>
  <div>
    <input type="text" v-model="textColor">
    <h1 :style="{ color: textColor }">color change!</h1>
  </div>
</template>

<script setup>
import { ref } from 'vue';

const textColor = ref('#000');

</script>

<style lang="scss" scoped>
</style>
2. 다음 코드를 참고하여 버튼을 클릭하면 아래 텍스트가 안보였다가, 다시 클릭하면 보이도록(toggle) 구현하시오.
<template>
  <div>
    <button>toggle</button>

    <div>보일까 안보일까??</div>
  </div>
</template>

<script setup>

</script>

<style lang="scss" scoped>

</style>
- App.vue
<template>
  <div>
    <button @click="toggleText">toggle</button>

    <div v-if="isVisible">보일까 안보일까??</div>
  </div>
</template>

<script setup>
import { ref } from 'vue';

const isVisible = ref(true);

const toggleText = () => {
  isVisible.value = !isVisible.value;
};
</script>

<style lang="scss" scoped>
</style>
3. 다음 urls을 참고하여 name을 누르면 url로 이동할 수 있는 a태그들을 만드시오.
const urls = [
  { name: 'naver', url: 'https://www.naver.com/' },
  { name: 'google', url: 'https://www.google.com/' },
  { name: 'github', url: 'https://github.com/'},
  { name: 'vue', url: 'https://ko.vuejs.org/'},
]
- App.vue
<template>
  <div>
    <ul>
      <li v-for="link in urls" :key="link.name">
        <a :href="link.url" target="_blank">{{ link.name }}</a>
      </li>
    </ul>
  </div>
</template>

<script setup>
const urls = [
  { name: 'naver', url: 'https://www.naver.com/' },
  { name: 'google', url: 'https://www.google.com/' },
  { name: 'github', url: 'https://github.com/Nahhh-j'},
  { name: 'vue', url: 'https://ko.vuejs.org/'},
];
</script>

<style lang="scss" scoped>
</style>
4. bootsrap와 주어진 이미지를 활용하여 다음 화면을 만드시오.
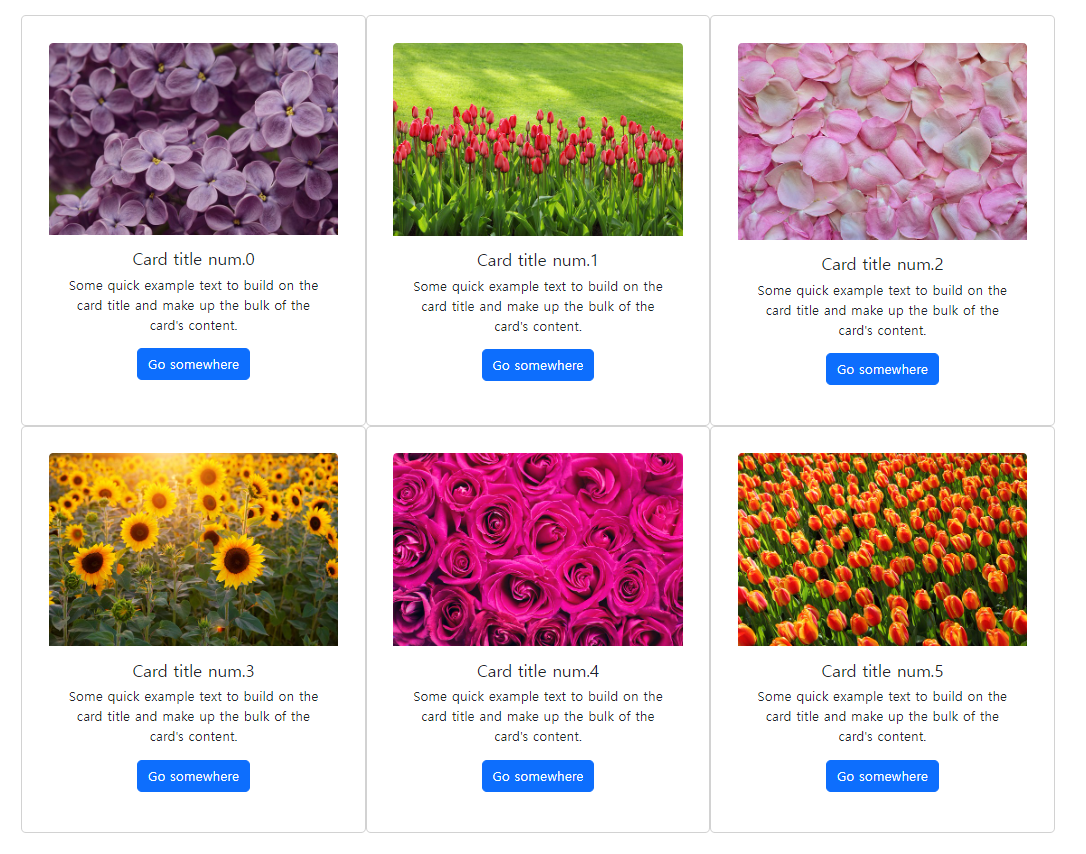
- hint : bootstrap의 cdn은 index.html에 추가하시오
- hint : https://getbootstrap.com/docs/5.3/components/card/#example 를 활용하였으며, style="width: 18rem;" 속성은 삭제하시오.
<template>
  <div>
    <form @submit.prevent="">
      <input>
      <input type="submit" value="제출">
    </form>
    <ul>
      <li v-for="todo in todos">
        {{ todo.text }}
      </li>
    </ul>
  </div>
</template>

<script setup>
import { reactive, ref } from 'vue'

const todos = reactive([
  { text: 'Hello' },
  { text: 'World' },
  { text: 'and Vue!' }
])

</script>

<style lang="scss" scoped>
</style>
- App.vue
<template>
  <div class="container">
    <div class="row">
      <div class="col-md-4" v-for="index in 6" :key="index">
        <div class="card border-secondary mb-3">
          <img :src="getImagePath(index - 1)" class="card-img-top" :alt="'Card Image ' + index">
          <div class="card-body text-center">
            <h5 class="card-title">{{ 'Card title num.' + (index - 1) }}</h5>
            <p class="card-text">Some quick example text to build on the card title and make up the bulk of the card's content.</p>
            <a href="#" class="btn btn-primary">Go somewhere</a>
          </div>
        </div>
      </div>
    </div>
  </div>
</template>

<script>
export default {
  methods: {
    getImagePath(index) {
      return `src/assets/images/img${index}.jpg`;
    }
  }
}
</script>

<style scoped>
.card {
  margin: auto;
}
</style>
- index.html
<html lang="en">
<head>
  <meta charset="UTF-8">
  <meta name="viewport" content="width=device-width, initial-scale=1.0">
  <title>Bootstrap Card Example</title>
  <!-- Bootstrap CSS -->
  <link href="https://cdn.jsdelivr.net/npm/bootstrap@5.3.0-alpha1/dist/css/bootstrap.min.css" rel="stylesheet">
</head>
<body>

<div id="app" class="container">
  <script type="module" src="/src/main.js"></script>
  <div class="row">
    <div v-for="(item, index) in cardData" :key="index" class="col-md-4 mb-3">
      <div class="card border-secondary">
        <img :src="item.image" class="card-img-top" alt="Card Image">
        <div class="card-body text-center">
          <h5 class="card-title">{{ item.title }}</h5>
          <p class="card-text">내용</p>
          <a href="#" class="btn btn-primary">Go somewhere</a>
        </div>
      </div>
    </div>
  </div>
</div>
5. 다음 코드를 참고하여 할일을 입력 후 제출을 누르면 아래 목록에 추가되도록 작성하시오.
- hint: JavaScript에서 list에 원소를 더하는 메서드는 push이다.
<template>
  <div>
    <form @submit.prevent="">
      <input>
      <input type="submit" value="제출">
    </form>
    <ul>
      <li v-for="todo in todos">
        {{ todo.text }}
      </li>
    </ul>
  </div>
</template>

<script setup>
import { reactive, ref } from 'vue'

const todos = reactive([
  { text: 'Hello' },
  { text: 'World' },
  { text: 'and Vue!' }
])

</script>

<style lang="scss" scoped>
</style>
- App.vue
<template>
  <div>
    <form @submit.prevent="addTodo">
      <input v-model="newTodo" placeholder="할일을 입력하세요">
      <input type="submit" value="제출">
    </form>
    <ul>
      <li v-for="(todo, index) in todos" :key="index">
        {{ todo.text }}
      </li>
    </ul>
  </div>
</template>

<script setup>
import { reactive, ref } from 'vue'

const todos = reactive([
  { text: 'Hello' },
  { text: 'World' },
  { text: 'and Vue!' }
])

const newTodo = ref('')

const addTodo = () => {
  if (newTodo.value.trim() !== '') {
    todos.push({ text: newTodo.value.trim() })
    newTodo.value = ''
  }
}
</script>

<style lang="scss" scoped>

li {
  list-style: none;
}

</style>
'Vue' 카테고리의 다른 글
| Pinia (0) | 2024.03.27 |
|---|---|
| Vue 실습(2) (0) | 2024.03.27 |
| Vue : Component, Props, Emit (0) | 2024.03.27 |
| Vue 활용 기초(2) (0) | 2024.03.26 |
| Vue 활용 기초(1) (0) | 2024.03.26 |
[실습]
1. 다음 코드를 참고하여 색상을 입력하면 텍스트이 색상이 변하도록 구현하시오.
<template>
  <div>
    <input type="text">
    <h1 :style="`color: ${text};`">color change!</h1>
  </div>
</template>

<script setup>

</script>

<style lang="scss" scoped>

</style>
- App.vue
<template>
  <div>
    <input type="text" v-model="textColor">
    <h1 :style="{ color: textColor }">color change!</h1>
  </div>
</template>

<script setup>
import { ref } from 'vue';

const textColor = ref('#000');

</script>

<style lang="scss" scoped>
</style>
2. 다음 코드를 참고하여 버튼을 클릭하면 아래 텍스트가 안보였다가, 다시 클릭하면 보이도록(toggle) 구현하시오.
<template>
  <div>
    <button>toggle</button>

    <div>보일까 안보일까??</div>
  </div>
</template>

<script setup>

</script>

<style lang="scss" scoped>

</style>
- App.vue
<template>
  <div>
    <button @click="toggleText">toggle</button>

    <div v-if="isVisible">보일까 안보일까??</div>
  </div>
</template>

<script setup>
import { ref } from 'vue';

const isVisible = ref(true);

const toggleText = () => {
  isVisible.value = !isVisible.value;
};
</script>

<style lang="scss" scoped>
</style>
3. 다음 urls을 참고하여 name을 누르면 url로 이동할 수 있는 a태그들을 만드시오.
const urls = [
  { name: 'naver', url: 'https://www.naver.com/' },
  { name: 'google', url: 'https://www.google.com/' },
  { name: 'github', url: 'https://github.com/'},
  { name: 'vue', url: 'https://ko.vuejs.org/'},
]
- App.vue
<template>
  <div>
    <ul>
      <li v-for="link in urls" :key="link.name">
        <a :href="link.url" target="_blank">{{ link.name }}</a>
      </li>
    </ul>
  </div>
</template>

<script setup>
const urls = [
  { name: 'naver', url: 'https://www.naver.com/' },
  { name: 'google', url: 'https://www.google.com/' },
  { name: 'github', url: 'https://github.com/Nahhh-j'},
  { name: 'vue', url: 'https://ko.vuejs.org/'},
];
</script>

<style lang="scss" scoped>
</style>
4. bootsrap와 주어진 이미지를 활용하여 다음 화면을 만드시오.
- hint : bootstrap의 cdn은 index.html에 추가하시오
- hint : https://getbootstrap.com/docs/5.3/components/card/#example 를 활용하였으며, style="width: 18rem;" 속성은 삭제하시오.
<template>
  <div>
    <form @submit.prevent="">
      <input>
      <input type="submit" value="제출">
    </form>
    <ul>
      <li v-for="todo in todos">
        {{ todo.text }}
      </li>
    </ul>
  </div>
</template>

<script setup>
import { reactive, ref } from 'vue'

const todos = reactive([
  { text: 'Hello' },
  { text: 'World' },
  { text: 'and Vue!' }
])

</script>

<style lang="scss" scoped>
</style>
- App.vue
<template>
  <div class="container">
    <div class="row">
      <div class="col-md-4" v-for="index in 6" :key="index">
        <div class="card border-secondary mb-3">
          <img :src="getImagePath(index - 1)" class="card-img-top" :alt="'Card Image ' + index">
          <div class="card-body text-center">
            <h5 class="card-title">{{ 'Card title num.' + (index - 1) }}</h5>
            <p class="card-text">Some quick example text to build on the card title and make up the bulk of the card's content.</p>
            <a href="#" class="btn btn-primary">Go somewhere</a>
          </div>
        </div>
      </div>
    </div>
  </div>
</template>

<script>
export default {
  methods: {
    getImagePath(index) {
      return `src/assets/images/img${index}.jpg`;
    }
  }
}
</script>

<style scoped>
.card {
  margin: auto;
}
</style>
- index.html
<html lang="en">
<head>
  <meta charset="UTF-8">
  <meta name="viewport" content="width=device-width, initial-scale=1.0">
  <title>Bootstrap Card Example</title>
  <!-- Bootstrap CSS -->
  <link href="https://cdn.jsdelivr.net/npm/bootstrap@5.3.0-alpha1/dist/css/bootstrap.min.css" rel="stylesheet">
</head>
<body>

<div id="app" class="container">
  <script type="module" src="/src/main.js"></script>
  <div class="row">
    <div v-for="(item, index) in cardData" :key="index" class="col-md-4 mb-3">
      <div class="card border-secondary">
        <img :src="item.image" class="card-img-top" alt="Card Image">
        <div class="card-body text-center">
          <h5 class="card-title">{{ item.title }}</h5>
          <p class="card-text">내용</p>
          <a href="#" class="btn btn-primary">Go somewhere</a>
        </div>
      </div>
    </div>
  </div>
</div>
5. 다음 코드를 참고하여 할일을 입력 후 제출을 누르면 아래 목록에 추가되도록 작성하시오.
- hint: JavaScript에서 list에 원소를 더하는 메서드는 push이다.
<template>
  <div>
    <form @submit.prevent="">
      <input>
      <input type="submit" value="제출">
    </form>
    <ul>
      <li v-for="todo in todos">
        {{ todo.text }}
      </li>
    </ul>
  </div>
</template>

<script setup>
import { reactive, ref } from 'vue'

const todos = reactive([
  { text: 'Hello' },
  { text: 'World' },
  { text: 'and Vue!' }
])

</script>

<style lang="scss" scoped>
</style>
- App.vue
<template>
  <div>
    <form @submit.prevent="addTodo">
      <input v-model="newTodo" placeholder="할일을 입력하세요">
      <input type="submit" value="제출">
    </form>
    <ul>
      <li v-for="(todo, index) in todos" :key="index">
        {{ todo.text }}
      </li>
    </ul>
  </div>
</template>

<script setup>
import { reactive, ref } from 'vue'

const todos = reactive([
  { text: 'Hello' },
  { text: 'World' },
  { text: 'and Vue!' }
])

const newTodo = ref('')

const addTodo = () => {
  if (newTodo.value.trim() !== '') {
    todos.push({ text: newTodo.value.trim() })
    newTodo.value = ''
  }
}
</script>

<style lang="scss" scoped>

li {
  list-style: none;
}

</style>
'Vue' 카테고리의 다른 글
| Pinia (0) | 2024.03.27 |
|---|---|
| Vue 실습(2) (0) | 2024.03.27 |
| Vue : Component, Props, Emit (0) | 2024.03.27 |
| Vue 활용 기초(2) (0) | 2024.03.26 |
| Vue 활용 기초(1) (0) | 2024.03.26 |